前言
一直以来,我都是通过同步本地文件到 AWS S3 的方式实现数据备份的。不过,由于 S3 并不支持在线编辑、图片预览等功能,因此我还需要一款合适的网盘应用来充当中间件。
经过一番探索,我最终锁定了 File Browser。这是一款基于 Go 语言开发的网盘应用,相较于 Minio、Nextcloud 等主流产品,它更加轻量简洁,足够贴合我的需求。
准备工作
- 准备一台 Linux 服务器,我使用的是 Ubuntu Server 22.04 LTS。
- 配置服务器对外开放 80 和 443 端口,前者是 Certbot 的注册端口,后者是 HTTPS 的默认端口。
- 在域名提供商处添加一条 DNS A 记录指向服务器的公网 IP 地址,如
files.waddledee.com。
安装 Docker Engine
- SSH 远程连接到服务器,更新 apt 包索引:
1
sudo apt-get update
- 安装软件包以允许 apt 通过 HTTPS 使用存储库,按 Y 继续:
1
sudo apt-get install ca-certificates curl gnupg lsb-release
- 添加 Docker 官方的 GPG 密钥:
1
2
sudo mkdir -p /etc/apt/keyrings
curl -fsSL https://download.docker.com/linux/ubuntu/gpg | sudo gpg --dearmor -o /etc/apt/keyrings/docker.gpg - 配置 stable 版本的 Docker 存储库:
1
2
3
echo \
"deb [arch=$(dpkg --print-architecture) signed-by=/etc/apt/keyrings/docker.gpg] https://download.docker.com/linux/ubuntu \
$(lsb_release -cs) stable" | sudo tee /etc/apt/sources.list.d/docker.list > /dev/null - 再次更新 apt 包索引:
1
sudo apt-get update
- 安装 Docker Engine,按 Y 继续:
1
sudo apt-get install docker-ce docker-ce-cli containerd.io docker-compose-plugin
- 检查 Docker Engine 是否安装成功:
1
docker --version
安装 Docker Compose
- 下载 stable 版本的 Docker Compose:
1
sudo curl -SL https://github.com/docker/compose/releases/download/v2.14.0/docker-compose-linux-x86_64 -o /usr/local/bin/docker-compose
- 为 Docker Compose 添加执行权限:
1
sudo chmod +x /usr/local/bin/docker-compose
- 检查 Docker Compose 是否安装成功:
1
docker-compose --version
配置目录与权限
- 添加当前用户到 docker 组:
1
sudo usermod -aG docker $USER
- 注销并重新登录以使权限生效:
1
exit
- 创建用于存放容器数据的目录:
1
sudo mkdir /opt/services
- 配置当前用户对该目录的执行权和所有权:
1
2
sudo chmod -R 700 /opt/services
sudo chown -R $USER:$USER /opt/services - 切换到该目录:
1
cd /opt/services
安装 File Browser
- 创建用于存放 File Browser 数据的目录:
1
mkdir filebrowser
- 创建 File Browser 数据库文件:
1
touch filebrowser/filebrowser.db
- 创建 Docker Compose 文件:
1
nano docker-compose.yml
- 复制如下内容,按 Ctrl+X 保存并退出,按 Y 确认,按 Enter 返回命令行:
1
2
3
4
5
6
7
8
9
10
version: '3'
services:
filebrowser:
container_name: services-filebrowser
image: filebrowser/filebrowser:latest
volumes:
- ./filebrowser:/srv
- ./filebrowser/filebrowser.db:/database.db
restart: unless-stopped - 在后台创建并启动 filebrowser 容器:
1
docker-compose up -d
- 检查 filebrowser 容器的状态:状态为 healthy 即表示容器运行正常:
1
docker ps
1
2
CONTAINER ID IMAGE COMMAND CREATED STATUS PORTS NAMES
d7e887b393d6 filebrowser/filebrowser:latest "/filebrowser" About a minute ago Up About a minute (healthy) 0.0.0.0:8080->80/tcp, :::8080->80/tcp services-filebrowser
配置 File Browser
申请 SSL 证书
- 编辑 Docker Compose 文件:
1
nano docker-compose.yml
- 覆盖如下内容,按 Ctrl+X 保存并退出,按 Y 确认,按 Enter 返回命令行:
1
2
3
4
5
6
7
8
9
10
11
12
13
14
15
16
17
18
19
20
21
22
23
24
25
26
27
28
29
30
version: '3'
services:
filebrowser:
container_name: services-filebrowser
image: filebrowser/filebrowser:latest
volumes:
- ./filebrowser:/srv
- ./filebrowser/filebrowser.db:/database.db
restart: unless-stopped
nginx:
container_name: services-nginx
image: nginx:latest
ports:
- 80:80
volumes:
- ./nginx:/etc/nginx/conf.d
- ./certbot/conf:/etc/nginx/ssl
- ./certbot/data:/var/www/certbot
restart: unless-stopped
certbot:
container_name: services-certbot
image: certbot/certbot:latest
command: certonly --webroot --webroot-path=/var/www/certbot --email parasol@waddledee.com --agree-tos --no-eff-email --keep-until-expiring -d files.waddledee.com
volumes:
- ./certbot/conf:/etc/letsencrypt
- ./certbot/data:/var/www/certbot
- ./certbot/logs:/var/log/letsencryptNGINX 在这里的作用是通过其侦听的 80 端口帮助 Certbot 完成 ACME Challenge。
- 创建用于存放 NGINX 配置的目录:
1
mkdir nginx
- 创建用于 ACME Challenge 的 NGINX 配置文件:
1
nano nginx/certbot.conf
- 复制如下内容,按 Ctrl+X 保存并退出,按 Y 确认,按 Enter 返回命令行:
1
2
3
4
5
6
7
8
server {
listen 80;
location ~ /.well-known/acme-challenge {
allow all;
root /var/www/certbot;
}
} - 在后台创建并启动 NGINX 和 Certbot 容器:
1
docker-compose up -d
- 检查 NGINX 和 Certbot 容器的状态:NGINX 的状态为 Up,Certbot 的状态为 Exited (0) 即表示容器运行正常:
1
docker ps -a
1
2
3
4
CONTAINER ID IMAGE COMMAND CREATED STATUS PORTS NAMES
ee83f9c68c64 nginx:latest "/docker-entrypoint.…" About a minute ago Up About a minute 0.0.0.0:80->80/tcp, :::80->80/tcp, 0.0.0.0:443->443/tcp, :::443->443/tcp services-nginx
a70f71af35e2 certbot/certbot:latest "certbot certonly --…" About a minute ago Exited (0) About a minute ago services-certbot
d7e887b393d6 filebrowser/filebrowser:latest "/filebrowser" About a minute ago Up About a minute (healthy) 0.0.0.0:8080->80/tcp, :::8080->80/tcp services-filebrowser - 查看 Certbot 日志以确认证书申请结果:看到 Successfully received certificate 即表示证书申请成功:
1
cat certbot/logs/letsencrypt.log
1
2
3
4
5
6
7
8
...
2022-12-11 13:42:51,842:DEBUG:certbot._internal.display.obj:Notifying user:
Successfully received certificate.
Certificate is saved at: /etc/letsencrypt/live/files.waddledee.com/fullchain.pem
Key is saved at: /etc/letsencrypt/live/files.waddledee.com/privkey.pem
This certificate expires on 2023-03-11.
These files will be updated when the certificate renews.
...
绑定 SSL 证书
- 编辑 Docker Compose 文件:
1
nano docker-compose.yml
- 覆盖如下内容,按 Ctrl+X 保存并退出,按 Y 确认,按 Enter 返回命令行:
1
2
3
4
5
6
7
8
9
10
11
12
13
14
15
16
17
18
19
20
21
22
23
24
25
26
27
28
29
30
31
version: '3'
services:
filebrowser:
container_name: services-filebrowser
image: filebrowser/filebrowser:latest
volumes:
- ./filebrowser:/srv
- ./filebrowser/filebrowser.db:/database.db
restart: unless-stopped
nginx:
container_name: services-nginx
image: nginx:latest
ports:
- 80:80
- 443:443
volumes:
- ./nginx:/etc/nginx/conf.d
- ./certbot/conf:/etc/nginx/ssl
- ./certbot/data:/var/www/certbot
restart: unless-stopped
certbot:
container_name: services-certbot
image: certbot/certbot:latest
command: certonly --webroot --webroot-path=/var/www/certbot --email parasol@waddledee.com --agree-tos --no-eff-email --keep-until-expiring -d files.waddledee.com
volumes:
- ./certbot/conf:/etc/letsencrypt
- ./certbot/data:/var/www/certbot
- ./certbot/logs:/var/log/letsencrypt - 添加当前用户对证书所在目录的读取权限:
1
sudo chmod -R 755 certbot/conf/live
- 创建 File Browser 的 NGINX 配置文件:
1
nano nginx/filebrowser.conf
- 复制如下内容,按 Ctrl+X 保存并退出,按 Y 确认,按 Enter 返回命令行:
1
2
3
4
5
6
7
8
9
10
11
12
13
14
15
16
17
18
19
20
21
server {
listen 80;
server_name files.waddledee.com;
location / {
return 301 https://files.waddledee.com$request_uri;
}
}
server {
listen 443 ssl;
server_name files.waddledee.com;
ssl_certificate /etc/nginx/ssl/live/files.waddledee.com/fullchain.pem;
ssl_certificate_key /etc/nginx/ssl/live/files.waddledee.com/privkey.pem;
location / {
proxy_pass http://services-filebrowser:80;
client_max_body_size 0;
}
} - 在后台创建并启动所有容器:
1
docker-compose up -d
- 检查所有容器的状态:确认所有容器运行正常:
1
docker ps -a
1
2
3
4
CONTAINER ID IMAGE COMMAND CREATED STATUS PORTS NAMES
ee83f9c68c64 nginx:latest "/docker-entrypoint.…" About a minute ago Up About a minute 0.0.0.0:80->80/tcp, :::80->80/tcp, 0.0.0.0:443->443/tcp, :::443->443/tcp services-nginx
a70f71af35e2 certbot/certbot:latest "certbot certonly --…" About a minute ago Exited (0) About a minute ago services-certbot
d7e887b393d6 filebrowser/filebrowser:latest "/filebrowser" About a minute ago Up About a minute (healthy) 0.0.0.0:8080->80/tcp, :::8080->80/tcp services-filebrowser
应用更新与证书续订
- 创建更新脚本:
1
nano upgrade.sh
- 复制如下内容,按 Ctrl+X 保存并退出,按 Y 确认,按 Enter 返回命令行:
1
2
3
4
5
#!/bin/bash
cd /opt/services
docker-compose pull
docker-compose up -d --remove-orphans
docker image prune -af - 为脚本添加执行权限:
1
chmod 700 upgrade.sh
- 打开 crontab 配置文件,首次打开时选择一款编辑器:
1
crontab -e
- 配置 cron 任务,完成后按 Ctrl+X 保存并退出,按 Y 确认,按 Enter 返回命令行。以下示例配置为每周一 00:00 触发更新脚本,并将日志输出到 /opt/services/upgrade.log:
1
0 0 * * 1 /opt/services/upgrade.sh >/opt/services/upgrade.log 2>&1
- 检查脚本是否执行成功:成功的输出结果如下所示:
1
cat /opt/services/upgrade.log
1
2
3
4
5
6
7
8
9
10
11
12
nginx Pulling
certbot Pulling
filebrowser Pulling
nginx Pulled
certbot Pulled
filebrowser Pulled
Container nginx Running
Container certbot Created
Container filebrowser Running
Container certbot Starting
Container certbot Started
Total reclaimed space: 0B - 查看 Certbot 日志以确认证书续订情况:因为我在 Certbot 命令中指定了 --keep-until-expiring 参数,所以证书会在到期时自动续订:
1
cat certbot/logs/letsencrypt.log
1
2
3
4
5
...
2022-12-11 13:51:18,686:DEBUG:certbot._internal.display.obj:Notifying user: Certificate not yet due for renewal
2022-12-11 13:51:18,686:INFO:certbot._internal.main:Keeping the existing certificate
2022-12-11 13:51:18,686:DEBUG:certbot._internal.display.obj:Notifying user: Certificate not yet due for renewal; no action taken.
...
更改管理员密码
- 访问
https://files.waddledee.com,登录默认的管理员账号,用户名和密码都是 admin:
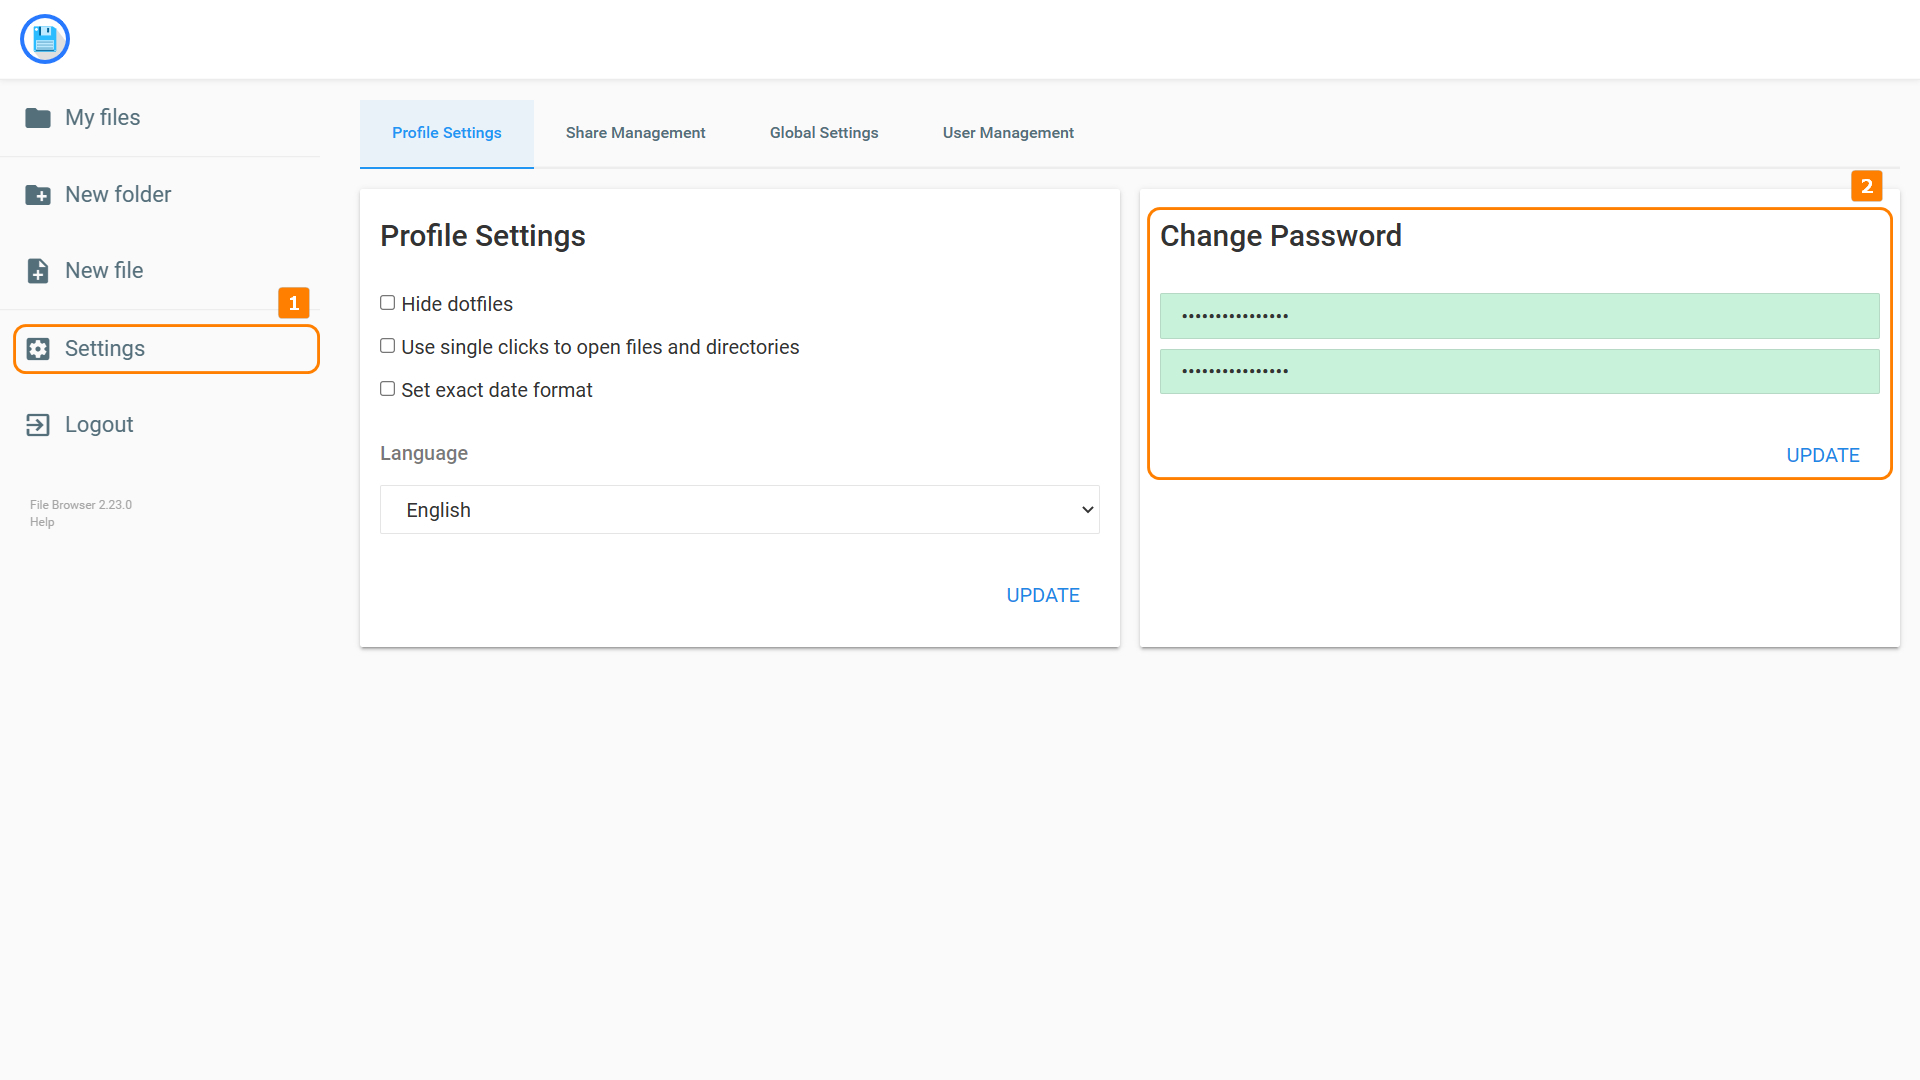
- 点击 Settings,输入新的管理员密码后点击 UPDATE:

备份 File Browser
最后,我将 File Browser 的文件同步到 AWS S3 实现数据备份。
此方法仅适用于 File Browser 服务器是一台 EC2 实例,且与 S3 存储桶位于同一 AWS 账号下的情况,其他 VPS 请使用 Access Keys 方法。
配置 AWS 服务
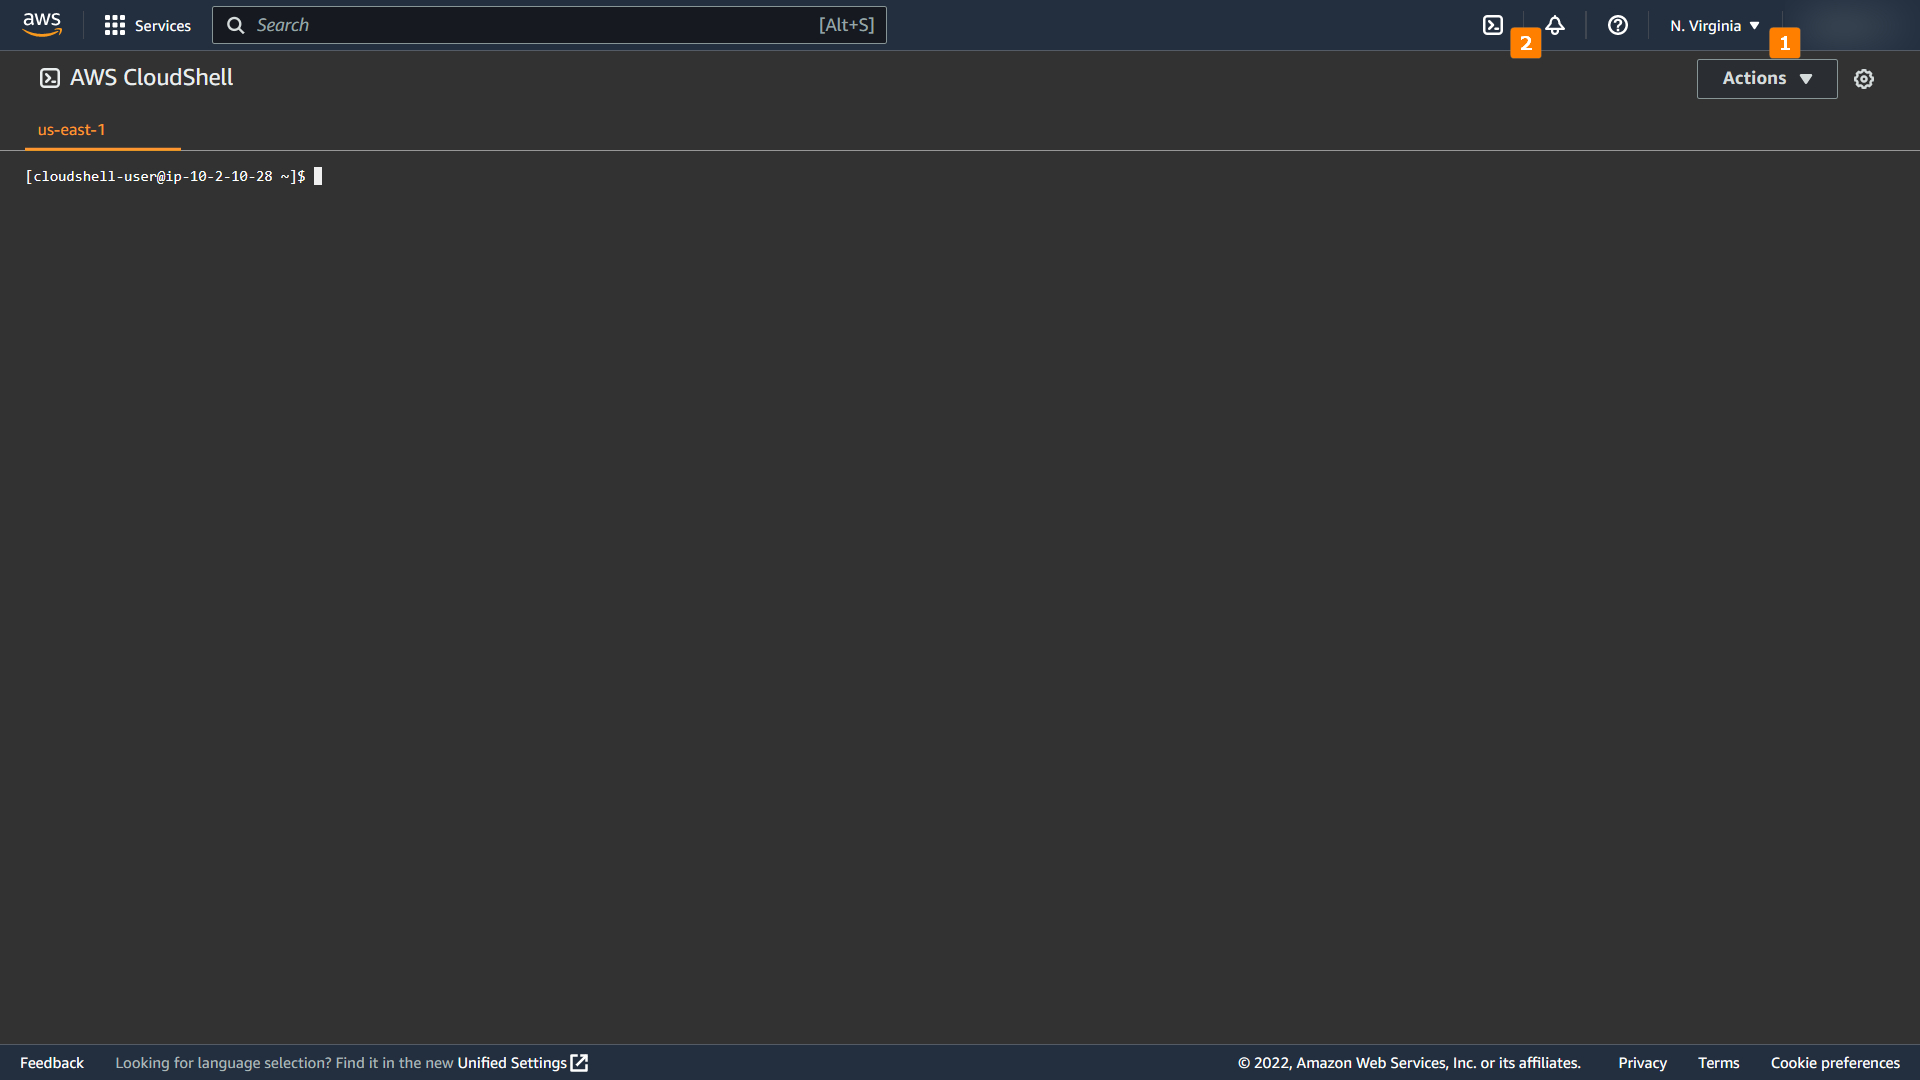
- 登录 AWS Console 并切换到支持 AWS CloudShell 的区域,如
N.Virginia,随后打开 CloudShell:
- 创建一个 S3 存储桶:
1
aws s3api create-bucket --bucket filebrowser --create-bucket-configuration LocationConstraint=ap-east-1 --region ap-east-1
S3 存储桶的名称在全球范围内是唯一的,请注意替换上面 --bucket 的值。
- 阻止该 S3 存储桶的公共访问:
1
aws s3api put-public-access-block --bucket filebrowser --public-access-block-configuration '{"BlockPublicAcls": true, "IgnorePublicAcls": true, "BlockPublicPolicy": true, "RestrictPublicBuckets": true}' --region ap-east-1
- 创建一个 IAM 角色:
1
aws iam create-role --role-name filebrowser --assume-role-policy-document '{"Version": "2012-10-17", "Statement": [{"Effect": "Allow", "Principal": {"Service": "ec2.amazonaws.com"}, "Action": "sts:AssumeRole"}]}'
- 赋予该角色读写 S3 存储桶的权限:
1
aws iam put-role-policy --role-name filebrowser --policy-name filebrowser --policy-document '{"Version": "2012-10-17", "Statement": [{"Effect": "Allow", "Action": ["s3:ListBucket", "s3:GetObject", "s3:PutObject", "s3:DeleteObject"], "Resource": ["arn:aws:s3:::filebrowser", "arn:aws:s3:::filebrowser/*"]}]}'
- 创建一个 IAM 实例配置文件,它的作用是将 IAM 角色传递给 EC2 实例:
1
aws iam create-instance-profile --instance-profile-name filebrowser
- 添加 IAM 角色到 IAM 实例配置文件:
1
aws iam add-role-to-instance-profile --role-name filebrowser --instance-profile-name filebrowser
- 关联 IAM 实例配置文件与 EC2 实例:
1
aws ec2 associate-iam-instance-profile --iam-instance-profile Name=filebrowser --instance-id i-1234567890abcdefg --region ap-east-1
同步到 AWS S3
- 返回服务器 SSH 远程连接窗口,安装 unzip:
1
sudo apt install unzip
- 下载、解压并安装 AWS CLI:
1
2
3
curl https://awscli.amazonaws.com/awscli-exe-linux-x86_64.zip -o awscliv2.zip
unzip awscliv2.zip
sudo ./aws/install - 将 File Browser 文件同步到 S3 存储桶:
1
aws s3 sync /opt/services/filebrowser s3://filebrowser --delete
- 打开 crontab 配置文件:
1
crontab -e
- 添加 cron 任务,完成后按 Ctrl+X 保存并退出,按 Y 确认,按 Enter 返回命令行。以下示例配置为每 15 分钟和 S3 存储桶同步一次:
1
*/15 * * * * aws s3 sync /opt/services/filebrowser s3://filebrowser --delete


